Table of Contents
Initial configuration of a SAMSUNG tizen screen
The initial configuration is loaded automatically the first time the screen is started.
However, this configuration wizard can be called up manually at any time using the remote control :
MENU > System > Configuration
PS : if the configuration menu is greyed out, first change the source to PC and try again..
Etape 1 : power up
- Take the remote control.
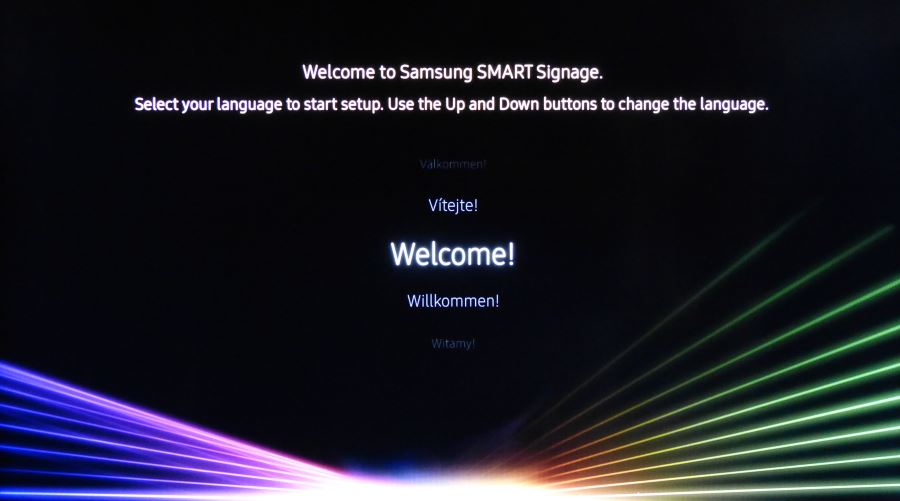
- Turn on the screen, a welcome message appears. We recommend that you leave the language in English by selecting “Welcome”.
lower or mute the sound to interrupt the welcome music, if necessary.

Etape 2 : orientation choice
Choose the “Landscape” or “Portrait” orientation depending on the physical orientation of the screen. If you don't know which orientation will be used later, choose “Landscape”.

Etape 3 : desactivate auto power off
desactivate “auto power off” : select“off”.

Etape 4 : Network configuration
If the question is asked, choose “Wired” for a cable connection, choose “Wireless” for a wifi connection. The wizard then starts a connectivity test.

If the connectivity test is successful, the following confirmation is displayed :

If you using static IP settings
If the screen has to be configured on a static ip, you can interrupt the test with the “STOP” button (or wait for the test to fail) and then use the “IP SETTINGS” button to specify the static IP settings.
Etape 5 : date and time settings
Set the date and time on the screen

Etape 6 : "URL Launcher" mode
Select the player type “URL Launcher”.


Enter the URL of the zebrix server you were given using the virtual keyboard.
Usually the URL is :
| For the USA | http://screen.zebrix.us |
| For Europe | http://screen.zebrix.net |
Attention, it is possible that you have to use another URL, please contact our support if needed.
Etape 7 : Device Name
You can skip this step using the right directional arrow on the remote control.

Etape 8 : The configuration is complete
The configuration is complete

Check the firmware version and, if necessary, update it.
Some firmware are too old and/or are known to have problems.
Here's how to check the firmware version used:
With the remote control : MENU > Support > Contact Samsung > The firmware version should be visible.
Please update the firmware to the recommended version using a USB stick using the following steps : Mise à jour du firmware d'un écran Samsung SSSP à l'aide d'une clé USB
Remote update with Zebrix CMS
If your monitor is properly connected to zebrix, you can use the remote update function from the “hardware tools”.
Etape 9 :Start Zebrix application
With the remote control: HOME > URL Launcher

The zebrix application will be downloaded and start.

Etape 10 : Screen activation
If the configuration went well, and the internet access is functional, the following activation page is displayed (only if the screen has never been activated before).

Please send an e-mail to activation@zebrix.net to request screen activation on your zebrix account. Our support can also be reached at +33 3 20 41 59 69.
As soon as the screen is activated, the following message will appear :

Etape 11 : Activate "Auto source switching" function
In order to ensure that the screen starts the zebrix application under all circumstances (even after an electrical restart, voluntary or involuntary source change, application crash, etc.), we recommend enabling the “Automatic source change” function.
The purpose of this function is to always ensure that the source of the display is automatically switched to a predefined primary source or, if no signal is present on that source, to a predefined secondary source. Since zebrix can only be set as the primary source, we can choose a primary source that will always be unused (HDMI1 for example) and set zebrix as a secondary source. The screen will then try to display HDMI1, but as this source has no signal, zebrix will be launched after a few seconds.
For activate this function:

MENU > System > General > Auto source switching

- Auto source switching : activé
- Recovery primary source : activé
- Primary source : HDMI1
- Secondary source: MagicInfo S / URL launcher (= zebrix)
Etape 12: Deactivate screen saver (SSSP10 only)
This screensaver-like function must be deactivated. The screen saver prevents our zebrix application from launching, so we need to disable this function to avoid any problems of this type.
To disable the function :
Press the menu key
Select Screen display
Select Screen protection
Disable screen saver the box must be unchecked as follows


